Making plastic parts is a difficult undertaking that involves several elements that must be addressed to meet the application’s needs. Processing issues, in addition to functional and structural concerns, play a significant influence in the design of an injection-molded plastic part.
The shape of the features in the part is largely determined by how the molten plastic penetrates, fills, and condenses within the insert mold to produce the part. Following a few simple injection molded component design rules results in a part that is not only easier to make and assemble, but also significantly stronger in service.
This article’s purpose is to demystify the injection molding process while keeping you informed about the specific considerations to put in mind for the process. Do enjoy your reading.
Table of Contents
Industry Application
Source: Pinterest
Plastic injection molding is the most common method for producing plastic items. Electronic housings, containers, bottle caps, automobile interiors, hair combs, and several other plastic products on the market today are all made via injection molding. Because multi-cavity injection molds can make multiple pieces in one cycle, it is suitable for creating big volumes of plastic parts.
High precision, repeatability, a vast material selection, cheap labor cost, little losses, and less need to finish parts after molding are some of the advantages of injection molding. This approach has some drawbacks, including high initial tooling costs and process constraints.
Equipment Used
1. An Injection Molding Machine
Source: Pinterest
Molds are fastened to the molding machine’s platen, whereby plastic is fed through the sprue opening into the plastic injection mold. The tonnage of a press is determined by calculating the amount of clamping force that the machine can exert.
During the injection molding process, this force maintains the insert mold closed. The tonnage ranges from less than 5 tons to 6,000 tons, with the higher size presses being utilized infrequently. The predicted area of the custom part being molded determines the overall clamp force required. Each square inch of the predicted area is multiplied by a clamping force ranging from 2 to 8 tons.
Source: Pinterest
Source: Pinterest
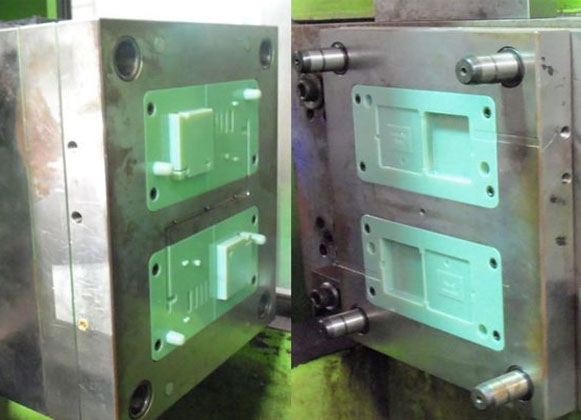
2. Mold
Source: Pinterest
The tooling used by an injection mold maker to make plastic items in molding is referred to as a mold or die. Large injection molds were traditionally expensive to build and were primarily utilized in large production applications involving thousands of pieces. Hardened steel, pre-hardened steel, aluminum, and/or beryllium-copper alloy are used to make molds. The most important consideration when choosing a material for a mold is cost.
Steel molds are normally more expensive to build, but they have a longer lifespan, which offsets the higher initial cost over a greater number of components produced before they wear out. Molds made of pre-hardened steel are even less wear-resistant and are typically utilized for smaller volume or larger components.
Injection Molding
Source: Pinterest
Injection molding involves gravity feeding granular plastic from a hopper into a heated barrel. The plastic is driven into a heated chamber called the barrel while the granules are steadily pushed forward by a screw-type plunger.
The molten plastic is driven via a nozzle that slots against the clear plastic mold sprue bushing as the plunger pushes, allowing it to penetrate the mold chamber via a gate and runner system. Because the mold is kept at a constant temperature, the plastic can harden virtually immediately after it is filled.
An Injection Molding Cycle
Source: Pinterest
The injection molding cycle is the sequence of events that occur during the injection molding of a plastic object. The cycle starts when the mold shuts, then the polymer is injected into the mold cavity. To accommodate for material contraction, a holding pressure is applied until the cavity is filled.
The screw turns in the next phase, supplying the next shot to the front screw. As the next shot is being prepared, the screw retracts. The 2k injection mold opens and the part is evacuated once the portion has cooled sufficiently.
Effects of Stress on the Process
Source: Pinterest
Stress is the number one enemy of just about any injection molded plastic object. The molecules are briefly disrupted whenever a plastic resin is melted while preparing for molding due to the heat and friction stress of the extruder, enabling the molecules to stream into the mold. The resin is pressed into the mold under pressure, sealing each feature, crack, & crevice.
The molecules are forced to bend, twist, and deform as they are pressed through each feature, forming the shape of the part. Turning severe or abrupt bends puts more strain on the molecule than leisurely turns with large radiuses. Molecules have a hard time forming abrupt transitions from one characteristic to another.
Gates
Source: Pinterest
A gate, or opening, must be included in every injection mold design to allow molten material to be injected through to the mold cavity.
Types of Gates Molding Processes
Manually Trimmed
After each cycle, an operator must physically remove the pieces from the runners with these gates. Gates that are manually cut are preferred for a variety of reasons:
The gate is too large to be sheared by the machine automatically.
PVC and other shear-sensitive materials cannot be subjected to extreme shear rates.
Flow distribution for systems that necessitate simultaneous material flow across a large front
Automatically Trimmed Types
When the tool opens to expel the part, these gates integrate elements in the tool that break or shear the gates. Gates that are automatically cut are utilized for a variety of reasons:
Reducing costs by avoiding gate removal as a subsequent procedure.
Keeping all parts’ cycle times consistent
Trying to get rid of gate scars on parts
Some common gate designs include Edge gate(most common gate that is used for flat parts), the sub gate(an automatically trimmed gate), hot tip gate(most common hot runner gate), and sprue or direct gate(a manually trimmed gate used for single cavity molds).
Other Considerations of the Injection Molding Process
Source: Pinterest
Wall Thickness
To eliminate problems, fluctuations in pressure, process velocity, and viscosity(for the plastic) should be avoided throughout the part cooling step of the molding process. Few factors are more important than wall thickness during this time. This characteristic can have a significant impact on the final part’s cost, production speed, and quality.
Draft
The sidewalls of the injection mold are tapered in the orientation that the mold opens to appropriately release the part as it opens. As soon as the mold opens, this draft permits the part to break away.
Sink Marks
The inner core cools at a different rate than the exterior skin, which has already cooled. Because of the disparity in cooling rates, the thick section of the component draws inward, leaving a sink mark on the exterior surface or, worse, entirely warping the component. The mark is not only ugly, but it also symbolizes additional stress that has been placed into the part.
The Bottom Line
The injection molding design process can seem simple and easy to the onlooker. However, if some of these considerations are not well taken care of, the products may not appear as needed. Also, following the above process and considerations might prove costly since you will need to account for both tools and staff.
This is where a mold design company comes in, they deliver highly accurate injection molded parts while keeping the customer service at a constant high. So rather than try building a costly DIY injection molding process, we do recommend that you contact the experts for assistance.